基础数据结构部分
动态字符串 SDS
实现在 sds.h/sds.c。
设计原则
为什么不使用c语言原生的字符串操作库? c字符串用'\0'作为终止符,不能满足二进制安全,而且求字符串长度,拼接等操作都要遍历到'\0'来实现,需要自己控制内存使用,操作复杂度高。
前置知识
由于我对C语言没有深入了解,有很多知识点会在前面补充。
attribute ((packed)): 对齐优化
attribute((args)) 是GNU C的一个机制,可以通过编译器来修饰结构体,函数等。
现代计算机中内存空间都是按照字节(byte)划分的,从理论上讲似乎对任何类型的变量的访问可以从任何地址开始,但实际情况是在访问特定变量的时候经常在特定的内存地址访问,这就需要各类型数据按照一定的规则在空间上排列,而不是顺序地一个接一个地排放,这就是对齐.
为了提高效率,计算机从内存中取数据是按照一个固定长度的。以32位机为例,它每次取32个位,也就是4个字节(每字节8个位)。字节对齐有什么好处?以int型数据为例,如果它在内存中存放的位置按4字节对齐,也就是说1个int的数据全部落在计算机一次取数的区间内,那么只需要取一次就可以了
使用__packed__参数是表示,使用原来的地址空间,编译时不要字节对齐,这样用时间换空间,使得结构体紧密。
详细的用法见 机制详解。
uint8_t uint16_t ... size_t 使用
后面加_t表示是一个typedef 定义的类型,本质是原有类型。这样做是为了更好的跨平台移植,因为不同的平台中int,long 这些基础类型可能占用的字节不同,这对于一些对内存严格要求的库造成不便。使用uint8_t 等类型,在不同平台上都代表占一个字节8位,便于程序的实现。
同理 size_t 也是用来保持跨平台移植性。可以是unsigned int unsigned char unsigned long等等,取决于实现,size_t = typeof(sizeof(X))。
static inline
头文件中很多函数使用了static inline 关键字,inline 建议编译器将函数作为一个宏内联,这样可以减少函数调用时的堆栈消耗,提高性能。但是编译器不一定会内联函数,这时候static可以保证这个函数是仅在本文件可见,避免重复包含冲突。
数据结构
这里以sdshdr8为例
// 一个字节 8位
// __attribute__ ((__packed__)) 用来告诉编译器取消结构在编译中的优化对齐,按照实际占用。
// 因为内存是按照2的倍数读取的,否则可能读两次,速度变慢。这里是用时间换空间
// 保证整个结构体的空间紧密
struct __attribute__ ((__packed__)) sdshdr8 {
    // buf 中已经使用的字节数
    uint8_t len; /* used */
    // 去掉头和null结束符,已经分配的字节数=有效长度+数据长度
    uint8_t alloc; /* excluding the header and null terminator */
    // 8位,只用前三位
    unsigned char flags; /* 3 lsb of type, 5 unused bits */
    // 柔性数组,没有分配之前不占内存
    char buf[];
};
记录了已经使用的空间和分配的空间,比C字符串操作效率更高。和 C 语言中的字符串操作相比,SDS 通过记录字符数组的使用长度和分配空间大小,避免了对字符串的遍历操作,降低了操作开销,进一步就可以帮助诸多字符串操作更加高效地完成,比如创建、追加、复制、比较等。
二进制安全
什么是二进制安全?通俗地讲,C语言中,用“\0”表示字符串的结束,如果字符串中本身就有“\0”字符,字符串就会被截断,即非二进制安全;若通过某种机制,保证读写字符串时不损害其内容,则是二进制安全。在网络报文中常常需要二进制安全。

sds使用 len 来控制字符串长度,而不是使用"\0",保障了二进制安全。
极致的内存使用
- 对于不同的长度的字符串有不同的结构,上面的sdshdr8 表示长度为8位的字符串,还有sdshdr16/32/64。保证不会因为字符串过小而额外浪费字节,也不会因为字符串过长而频繁扩容。 - 结构体紧密,放弃对齐优化。在前置说明了结构体使用编译器参数packed来放弃优化,用时间换空间。 - flag。使用一个unsigned char,8位的小端三位来表示结构体的性质(5/8/16/32/64)。 - 变长数组(柔性数组)。柔性数组成员(flexible array member),也叫伸缩性数组成员,只能被放在结构体的末尾。包含柔性数组成员的结构体,通过malloc函数为柔性数组动态分配内存。之所以用柔性数组存放字符串,是因为柔性数组的地址和结构体是连续的,这样查找内存更快(因为不需要额外通过指针找到字符串的位置);可以很方便地通过柔性数组的首地址偏移得到结构体首地址,进而能很方便地获取其余变量。
与c字符串函数
始终将buf指针暴露给上层,可以和c字符串函数切合。同时可以很容易地通过减去一个sdshdr大小偏移到结构体首部来调用结构体属性。

如下面的宏定义:

```c
#define SDS_HDR_VAR(T,s) struct sdshdr##T *sh = (void*)((s)-(sizeof(struct sdshdr##T)));
#define SDS_HDR(T,s) ((struct sdshdr##T *)((s)-(sizeof(struct sdshdr##T))))
```
基本操作
创建
sds _sdsnewlen(const void *init, size_t initlen, int trymalloc) {
    void *sh;
    sds s;
    char type = sdsReqType(initlen);
    // 因为通常总是有空字符串,而使用type5每增加一次就需要扩容,所以直接使用type 8 ---- 为什么不把type5直接删了?
    /* Empty strings are usually created in order to append. Use type 8
     * since type 5 is not good at this. */
    if (type == SDS_TYPE_5 && initlen == 0) type = SDS_TYPE_8;
    int hdrlen = sdsHdrSize(type);
    unsigned char *fp; /* flags pointer. */
    size_t usable;

    // initlen 是buf中实际装的大小,hdrlen是sds header大小,+1 是\0终止符
    assert(initlen + hdrlen + 1 > initlen); /* Catch size_t overflow */
    //malloc_usable还是调用tyymalloc_usable
    sh = trymalloc?
        s_trymalloc_usable(hdrlen+initlen+1, &usable) :
        s_malloc_usable(hdrlen+initlen+1, &usable);
    if (sh == NULL) return NULL;
    if (init==SDS_NOINIT)
        init = NULL;
    else if (!init)
        memset(sh, 0, hdrlen+initlen+1);
    // 指向buf
    s = (char*)sh+hdrlen;
    fp = ((unsigned char*)s)-1;
    usable = usable-hdrlen-1;
    // 可能申请的超过类型MaxSize
    if (usable > sdsTypeMaxSize(type))
        usable = sdsTypeMaxSize(type);
    switch(type) {
        case SDS_TYPE_5: {
            *fp = type | (initlen << SDS_TYPE_BITS);
            break;
        }
        case SDS_TYPE_8: {
            SDS_HDR_VAR(8,s);
            sh->len = initlen;
            sh->alloc = usable;
            *fp = type;
            break;
        }
    // ...
    }
    if (initlen && init)
        memcpy(s, init, initlen);
    s[initlen] = '\0';
    return s;
}
- 首先根据申请的初始大小来确定类型,通过类型可以确定hdr大小,然后来申请空间。
- 这里使用的s_trymalloc_usable与s_malloc_usable都是文件zmallo.c实现的内存管理函数,后面会专门讲解。这里只用知道它会申请前一个参数大小的空间,并且将空间大小赋值给后一个参数usable。
- 得到空间的首地址,加上头大小得到buf地址s,s[-1] 得到类型指针fp,usable减去头大小hdrlen和类型大小1得到实际可用大小。
- 根据类型来构建一个sds结构体,最后返回是buf的指针,补上终止符'\0'。这里使用的是一个宏,可以借鉴这种写法,一个经常使用的操作,如果写成函数,会增加堆栈调度消耗,写成宏可以提高性能,代价是编译后的文件大小会增加。
这是sds创建的底层实现,实际使用的是上层的封装,只是对这个函数的封装调用。
销毁
有两种方法,一种是直接销毁:
void sdsfree(sds s) {
    if (s == NULL) return;
    s_free((char*)s-sdsHdrSize(s[-1]));
}
一种是仅仅将sds的len标记为0,但是实际的buf并不会释放,而是等待覆写。这样可以优化性能。
扩容
sds _sdsMakeRoomFor(sds s, size_t addlen, int greedy) {
    void *sh, *newsh;
    size_t avail = sdsavail(s);
    size_t len, newlen, reqlen;
    char type, oldtype = s[-1] & SDS_TYPE_MASK;
    int hdrlen;
    size_t usable;

    /* Return ASAP if there is enough space left. */
    if (avail >= addlen) return s;

    len = sdslen(s);
    sh = (char*)s-sdsHdrSize(oldtype);
    reqlen = newlen = (len+addlen);
    // 这里是防止溢出
    assert(newlen > len);   /* Catch size_t overflow */
    if (greedy == 1) {
        // SDS_MAX_PREALLOC 是 1MB
        if (newlen < SDS_MAX_PREALLOC)
            newlen *= 2;
        else
            newlen += SDS_MAX_PREALLOC;
    }

    type = sdsReqType(newlen);

    /* Don't use type 5: the user is appending to the string and type 5 is
     * not able to remember empty space, so sdsMakeRoomFor() must be called
     * at every appending operation. */
    if (type == SDS_TYPE_5) type = SDS_TYPE_8;

    hdrlen = sdsHdrSize(type);
    assert(hdrlen + newlen + 1 > reqlen);  /* Catch size_t overflow */
    if (oldtype==type) {
        // 和原类型相同,则不用释放内存,直接将buf扩容即可
        newsh = s_realloc_usable(sh, hdrlen+newlen+1, &usable);
        if (newsh == NULL) return NULL;
        s = (char*)newsh+hdrlen;
    } else {
        /* Since the header size changes, need to move the string forward,
         * and can't use realloc */
        // 类型改变,需要重新申请内存,原内存释放
        newsh = s_malloc_usable(hdrlen+newlen+1, &usable);
        if (newsh == NULL) return NULL;
        memcpy((char*)newsh+hdrlen, s, len+1);
        s_free(sh);
        s = (char*)newsh+hdrlen;
        s[-1] = type;
        sdssetlen(s, len);
    }
    usable = usable-hdrlen-1;
    // type 是通过newlen判断得到的,而usable 是 hdrlen + newlen + 1 可能出现超出的情况
    if (usable > sdsTypeMaxSize(type))
        usable = sdsTypeMaxSize(type);
    sdssetalloc(s, usable);
    return s;
}
- 首先判断newlen加上len是否超出可用的大小avail,没超就不扩容。
- 和之前不同,这一版本加入了greedy参数,来调节扩容策略,当greedy为1时,每次会扩大的比所需要的更多,这样可以减少扩容频率。而greedy为0时,就是节约内存
- greedy为1时启用此策略: 如果newlen小于1MB,每次扩容二背,大于1MB时每次增加1MB。(每次2倍内存很快就耗尽了)
- 这里根据新的newlen来确定类型,如果类型不变,只需要扩展buf数组,而类型改变的话就需要重新申请内存。
跳表zskiplist
对应的代码在 server.h 和 t_zset.c。
跳表可以看作链表加上都多层索引,一般每两个
/* ZSETs use a specialized version of Skiplists */
typedef struct zskiplistNode {
sds ele; // 存储字符串类型的数据
double score; // 储存排序的分值
struct zskiplistNode *backward; // 后向指针 头节点和第一个节点都为NULL
struct zskiplistLevel {
struct zskiplistNode *forward; // 指向本层下一个节点
unsigned long span; // 跨度 指向本层下一个节点中间跨越的节点个数
} level[]; // 柔性数组,未分配内存时不占空间。初始化时,level 随机分配1~32
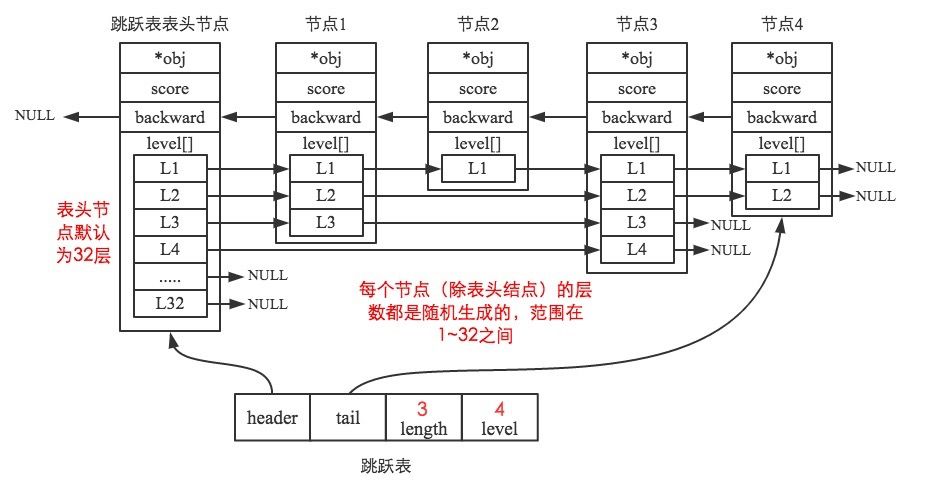
} zskiplistNode;
typedef struct zskiplist {
struct zskiplistNode *header, *tail;
unsigned long length; // 除了头节点以外节点总数
int level; // 跳表的高度
} zskiplist;
用的图片是网图 链接,其中obj一般为sds,在Redis6中已经改为sds ele。
可以从图和代码很清晰地看出跳跃表的结构。
跳跃表是Redis有序集合的底层实现方式之一,所以每个节点的ele存储有序集合的成员member值,score存储成员score值。所有节点的分值是按从小到大的方式排序的,当有序集合的成员分值相同时,节点会按member的字典序进行排序。
通过跳跃表结构体的属性我们可以看到,程序可以在O(1)的时间复杂度下,快速获取到跳跃表的头节点、尾节点、长度和高度。
创建
Redis通过zslRandomLevel函数随机生成一个1~32的值,作为新建节点的高度,值越大出现的概率越低。节点层高确定之后便不会再修改。生成随机层高的代码如下。
// ZSKIPLIST 为 0.25
int zslRandomLevel(void) {
    static const int threshold = ZSKIPLIST_P*RAND_MAX;
    int level = 1;
    while (random() < threshold)
        level += 1;
    // 这里 ZSKIPLIST_MAXLEVEL 为32
    return (level<ZSKIPLIST_MAXLEVEL) ? level : ZSKIPLIST_MAXLEVEL;
}
当p=0.25时,跳跃表节点的期望层高为1/(1-0.25)≈1.33。
下面是创建函数
/* Create a skiplist node with the specified number of levels.
 * The SDS string 'ele' is referenced by the node after the call. */
zskiplistNode *zslCreateNode(int level, double score, sds ele) {
    zskiplistNode *zn =
		    // level 柔性数组加上头大小 来申请内存
        zmalloc(sizeof(*zn)+level*sizeof(struct zskiplistLevel));
    zn->score = score;
    zn->ele = ele;
    return zn;
}

/* Create a new skiplist. */
zskiplist *zslCreate(void) {
    int j;
    zskiplist *zsl;

    zsl = zmalloc(sizeof(*zsl));
    zsl->level = 1;
    zsl->length = 0;
		// 头节点的level是最大层数
    zsl->header = zslCreateNode(ZSKIPLIST_MAXLEVEL,0,NULL);
    for (j = 0; j < ZSKIPLIST_MAXLEVEL; j++) {
        zsl->header->level[j].forward = NULL;
        zsl->header->level[j].span = 0;
    }
    zsl->header->backward = NULL;
    zsl->tail = NULL;
    return zsl;
}
头节点是一个特殊的节点,不存储有序集合的member信息。头节点是跳跃表中第一个插入的节点,其level数组的每项forward都为NULL, span值都为0
插入
/* Insert a new node in the skiplist. Assumes the element does not already
 * exist (up to the caller to enforce that). The skiplist takes ownership
 * of the passed SDS string 'ele'. */
zskiplistNode *zslInsert(zskiplist *zsl, double score, sds ele) {
    // 记录每层所能到达的最右边节点
    zskiplistNode *update[ZSKIPLIST_MAXLEVEL], *x;
    // 记录每层从header到update[i}所需的步长
    unsigned long rank[ZSKIPLIST_MAXLEVEL];
    int i, level;

    // 判断score 是不是NAN
    serverAssert(!isnan(score));
    x = zsl->header;
    // 从最高层索引开始遍历
    for (i = zsl->level-1; i >= 0; i--) {
        /* store rank that is crossed to reach the insert position */
        // 当在最高层时,先将rank赋值为0,先假设
        rank[i] = i == (zsl->level-1) ? 0 : rank[i+1];

        // 在第i层一直向前移动比较,因为是按照score 从小到大排列的
        // 找到这层大于插入score 的位置然后下移
        while (x->level[i].forward &&
                (x->level[i].forward->score < score ||
                    (x->level[i].forward->score == score &&
                    sdscmp(x->level[i].forward->ele,ele) < 0)))
        {
            // 更新总的span
            rank[i] += x->level[i].span;
            x = x->level[i].forward;
        }
        // 记录这层的终点
        update[i] = x;
    }
    /* we assume the element is not already inside, since we allow duplicated
     * scores, reinserting the same element should never happen since the
     * caller of zslInsert() should test in the hash table if the element is
     * already inside or not. */
    // zslInsert不能应用在插入节点已经存在的情况下。
    // 所以不用检查存在

    //为插入节点计算随机层数
    level = zslRandomLevel();
    //大于原来层高的部分,只需要调整header就行。
    if (level > zsl->level) {
        for (i = zsl->level; i < level; i++) {
            rank[i] = 0;
            update[i] = zsl->header;
            // 为啥是这个?可能是用来占位
            update[i]->level[i].span = zsl->length;
        }
        zsl->level = level;
    }

    x = zslCreateNode(level,score,ele);
    for (i = 0; i < level; i++) {
        // 插入到每层最右侧能到达的节点之后
        x->level[i].forward = update[i]->level[i].forward;
        update[i]->level[i].forward = x;

        /* update span covered by update[i] as x is inserted here */
        // 插入节点每层的span更新,这个看下图
        x->level[i].span = update[i]->level[i].span - (rank[0] - rank[i]);
        update[i]->level[i].span = (rank[0] - rank[i]) + 1;
    }

    /* increment span for untouched levels */
    for (i = level; i < zsl->level; i++) {
        update[i]->level[i].span++;
    }

    x->backward = (update[0] == zsl->header) ? NULL : update[0];
    if (x->level[0].forward)
        x->level[0].forward->backward = x;
    else
        zsl->tail = x;
    zsl->length++;
    return x;
}
下图来源于 链接

以节点19插入为例,其中 黑色箭头的表示的跨度为update[i]->level[i].span 蓝色箭头表示的跨度为rank[0] - rank[i]即节点19在level_0的update[0]为11, 在level_1的update[1]为7,rank[0] - rank[i]为节点7与节点11之间的跨度 绿色箭头表示的跨度为节点19到节点37的span
删除
首先查找到对应的节点,将每层最右边到达的节点记录下来,对应的update。 辅助函数:
void zslDeleteNode(zskiplist *zsl, zskiplistNode *x, zskiplistNode **update) {
    // 调整对应的span和forward
    int i;
    for (i = 0; i < zsl->level; i++) {
        if (update[i]->level[i].forward == x) {
            update[i]->level[i].span += x->level[i].span - 1;
            update[i]->level[i].forward = x->level[i].forward;
        } else {
            update[i]->level[i].span -= 1;
        }
    }
    if (x->level[0].forward) {
        x->level[0].forward->backward = x->backward;
    } else {
        zsl->tail = x->backward;
    }

    // 调整level
    while(zsl->level > 1 && zsl->header->level[zsl->level-1].forward == NULL)
        zsl->level--;
    zsl->length--;
}
删除函数:
int zslDelete(zskiplist *zsl, double score, sds ele, zskiplistNode **node) {
    zskiplistNode *update[ZSKIPLIST_MAXLEVEL], *x;
    int i;

    //查找位置
    x = zsl->header;
    for (i = zsl->level-1; i >= 0; i--) {
        while (x->level[i].forward &&
                (x->level[i].forward->score < score ||
                    (x->level[i].forward->score == score &&
                     sdscmp(x->level[i].forward->ele,ele) < 0)))
        {
            x = x->level[i].forward;
        }
        // 保存每层最右边的节点
        update[i] = x;
    }
    /* We may have multiple elements with the same score, what we need
     * is to find the element with both the right score and object. */
    // 可能同一个score有多个ele
    x = x->level[0].forward;
    if (x && score == x->score && sdscmp(x->ele,ele) == 0) {
        zslDeleteNode(zsl, x, update);
        if (!node)
            zslFreeNode(x);
        else
            *node = x;
        return 1;
    }
    return 0; /* not found */
}
压缩列表
具体的实现在ziplist.h和ziplist.c
压缩列表是Redis中一种高效利用内存的数据结构,用来储存字符串和数字,它的push和pop操作都是 O(1) 。Redis的有序集合、散列和列表都直接或者间接使用了压缩列表。当有序集合或散列表的元素个数比较少,且元素都是短字符串时,Redis便使用压缩列表作为其底层数据存储结构。列表使用快速链表(quicklist)数据结构存储,而快速链表就是双向链表与压缩列表的组合。
// ziplist 结构
<zlbytes> <zltail> <zllen> <entry> <entry> ... <entry> <zlend>
这里的所有结构都是按照小端存储。
- zlbytes: 压缩列表的字节长度,占4个字节,因此压缩列表最多有$2^{32}-1$个字节。这个设计是为了resize时不必遍历整个列表
- zltail: 压缩列表尾元素相对于压缩列表起始地址的偏移量,占4个字节,这个设计可以使pop操作不必要遍历全部。
- zllen: 压缩列表的元素个数,占2个字节。zllen无法存储元素个数超过65535($2^{16}-1$)的压缩列表,必须遍历整个压缩列表才能获取到元素个数。
- zlend: 压缩列表的结尾,占1个字节,恒为0xFF。
这里可以清楚地感受到C语言对内存的掌控,通过指针位移来获取结构信息。这里使用宏又是C语言的一个特色,比起inline只是建议编译器内联,宏真正是内联,对于一些细小而频繁的操作提高了性能。
/* Return total bytes a ziplist is composed of. */
#define ZIPLIST_BYTES(zl)       (*((uint32_t*)(zl)))

/* Return the offset of the last item inside the ziplist. */
#define ZIPLIST_TAIL_OFFSET(zl) (*((uint32_t*)((zl)+sizeof(uint32_t))))

/* Return the length of a ziplist, or UINT16_MAX if the length cannot be
 * determined without scanning the whole ziplist. */
#define ZIPLIST_LENGTH(zl)      (*((uint16_t*)((zl)+sizeof(uint32_t)*2)))

/* The size of a ziplist header: two 32 bit integers for the total
 * bytes count and last item offset. One 16 bit integer for the number
 * of items field. */
#define ZIPLIST_HEADER_SIZE     (sizeof(uint32_t)*2+sizeof(uint16_t))

/* Size of the "end of ziplist" entry. Just one byte. */
#define ZIPLIST_END_SIZE        (sizeof(uint8_t))

/* Return the pointer to the first entry of a ziplist. */
#define ZIPLIST_ENTRY_HEAD(zl)  ((zl)+ZIPLIST_HEADER_SIZE)

/* Return the pointer to the last entry of a ziplist, using the
 * last entry offset inside the ziplist header. */
#define ZIPLIST_ENTRY_TAIL(zl)  ((zl)+intrev32ifbe(ZIPLIST_TAIL_OFFSET(zl)))

/* Return the pointer to the last byte of a ziplist, which is, the
 * end of ziplist FF entry. */
#define ZIPLIST_ENTRY_END(zl)   ((zl)+intrev32ifbe(ZIPLIST_BYTES(zl))-ZIPLIST_END_SIZE)
对于
<prevlen> <encoding> <entry-data>
previous_entry_length字段表示前一个元素的字节长度,占1个或者5个字节,当前一个元素的长度小于254字节时,用1个字节表示;当前一个元素的长度大于或等于254字节时,用5个字节来表示。而此时previous_entry_length字段的第1个字节是固定的0xFE,后面4个字节才真正表示前一个元素的长度。假设已知当前元素的首地址为p,那么p-previous_entry_length就是前一个元素的首地址,从而实现压缩列表从尾到头的遍历。
encoding字段表示当前元素的编码,即content字段存储的数据类型(整数或者字节数组),数据内容存储在content字段。为了节约内存,encoding字段同样长度可变。
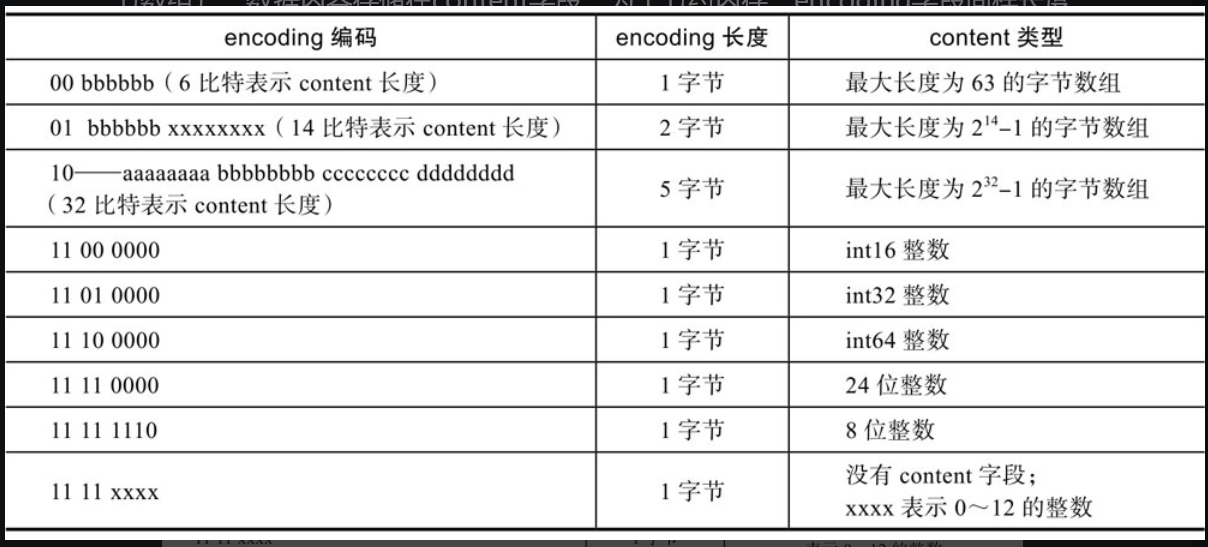
Redis使用宏来表示
#define ZIP_STR_MASK 0xc0
#define ZIP_INT_MASK 0x30
#define ZIP_STR_06B (0 << 6)
#define ZIP_STR_14B (1 << 6)
#define ZIP_STR_32B (2 << 6)
#define ZIP_INT_16B (0xc0 | 0<<4)
#define ZIP_INT_32B (0xc0 | 1<<4)
#define ZIP_INT_64B (0xc0 | 2<<4)
#define ZIP_INT_24B (0xc0 | 3<<4)
#define ZIP_INT_8B 0xfe
这里使用位运算来代表类型,既节省了内存又提高了性能。
结构
typedef struct zlentry {
    unsigned int prevrawlensize; /* Bytes used to encode the previous entry len*/
    unsigned int prevrawlen;     /* Previous entry len. */
    unsigned int lensize;        /* Bytes used to encode this entry type/len.
                                    For example strings have a 1, 2 or 5 bytes
                                    header. Integers always use a single byte.*/
    unsigned int len;            /* Bytes used to represent the actual entry.
                                    For strings this is just the string length
                                    while for integers it is 1, 2, 3, 4, 8 or
                                    0 (for 4 bit immediate) depending on the
                                    number range. */
    unsigned int headersize;     /* prevrawlensize + lensize. */
    unsigned char encoding;      /* Set to ZIP_STR_* or ZIP_INT_* depending on
                                    the entry encoding. However for 4 bits
                                    immediate integers this can assume a range
                                    of values and must be range-checked. */
    unsigned char *p;            /* Pointer to the very start of the entry, that
                                    is, this points to prev-entry-len field. */
} zlentry;
对于压缩列表的任意元素,获取前一个元素的长度、判断存储的数据类型、获取数据内容都需要经过复杂的解码运算。解码后的结果应该被缓存起来,为此定义了结构体zlentry,用于表示解码后的压缩列表元素。
解码操作,主要用宏实现:
static inline void zipEntry(unsigned char *p, zlentry *e) {
    ZIP_DECODE_PREVLEN(p, e->prevrawlensize, e->prevrawlen);
    ZIP_ENTRY_ENCODING(p + e->prevrawlensize, e->encoding);
    ZIP_DECODE_LENGTH(p + e->prevrawlensize, e->encoding, e->lensize, e->len);
    assert(e->lensize != 0); /* check that encoding was valid. */
    e->headersize = e->prevrawlensize + e->lensize;
    e->p = p;
}
这里主要就是对字节的读取,可以去看源代码。
操作
创建
/* Create a new empty ziplist. */
// 先申请初始的空间(4+4+2+1),再对zlbytes,zltail,zllen,zlend逐个初始化
unsigned char *ziplistNew(void) {
    unsigned int bytes = ZIPLIST_HEADER_SIZE+ZIPLIST_END_SIZE;
    unsigned char *zl = zmalloc(bytes);
    ZIPLIST_BYTES(zl) = intrev32ifbe(bytes);
    ZIPLIST_TAIL_OFFSET(zl) = intrev32ifbe(ZIPLIST_HEADER_SIZE);
    ZIPLIST_LENGTH(zl) = 0;
    zl[bytes-1] = ZIP_END;
    return zl;
}
插入元素
- 编码。计算previous_entry_length字段、encoding字段和content字段的内容。
字典
结构
节点:
typedef struct dictEntry {
    void *key;
    // 节省内存 不同场景下使用不同字段
    union {
        void *val; // db.dict 储存值
        uint64_t u64;
        int64_t s64;  // db.expires 储存过期时间
        double d;
    } v;
    // 单链表法 解决哈希冲突。
    struct dictEntry *next;     /* Next entry in the same hash bucket. */
    void *metadata[];           /* An arbitrary number of bytes (starting at a
                                 * pointer-aligned address) of size as returned
                                 * by dictType's dictEntryMetadataBytes(). */
} dictEntry;
可以看出是使用链表法来解决hash冲突的。
struct dict {
    dictType *type; // 对应特定类型操作函数

    dictEntry **ht_table[2]; // 哈希表。有两个,一个正常使用,另外一个在rehash时使用
    unsigned long ht_used[2]; // 记录每个哈希表被使用的数目。

    long rehashidx; /* rehashing not in progress if rehashidx == -1 */

    /* Keep small vars at end for optimal (minimal) struct padding */
    int16_t pauserehash; /* If >0 rehashing is paused (<0 indicates coding error) */
    // size 的 系数,size 是2 的N次幂
    signed char ht_size_exp[2]; /* exponent of size. (size = 1<<exp) */
};
这里可以看到一个dictType 用来对应特定类型的操作函数,这些函数体现了面向对象编程的思想,会在后面合适的时机用到。
比如找个hashFunction 用来控制dict使用的hash函数,默认为siphash。
typedef struct dictType {
    uint64_t (*hashFunction)(const void *key); // hash函数
    void *(*keyDup)(dict *d, const void *key); // key的 复制函数
    void *(*valDup)(dict *d, const void *obj); // val 的复制函数
    int (*keyCompare)(dict *d, const void *key1, const void *key2); // key 对比函数
    void (*keyDestructor)(dict *d, void *key); // key 销毁函数
    void (*valDestructor)(dict *d, void *obj); // val 销毁函数
    int (*expandAllowed)(size_t moreMem, double usedRatio); //扩展函数
    /* Allow a dictEntry to carry extra caller-defined metadata.  The
     * extra memory is initialized to 0 when a dictEntry is allocated. */
    size_t (*dictEntryMetadataBytes)(dict *d); // 元数据
} dictType;
创建
先申请空间,再初始化参数
/* Reset hash table parameters already initialized with _dictInit()*/
static void _dictReset(dict *d, int htidx)
{
    d->ht_table[htidx] = NULL;
    d->ht_size_exp[htidx] = -1;
    d->ht_used[htidx] = 0;
}

/* Create a new hash table */
dict *dictCreate(dictType *type)
{
    dict *d = zmalloc(sizeof(*d));

    _dictInit(d,type);
    return d;
}

/* Initialize the hash table */
int _dictInit(dict *d, dictType *type)
{
    _dictReset(d, 0);
    _dictReset(d, 1);
    d->type = type;
    d->rehashidx = -1;
    d->pauserehash = 0;
    return DICT_OK; // 使用一些宏来反馈结果
}
增加与扩容
这里先提前讲一下Rehash的概念,便于理解增加扩容中的一些操作:
扩容后,字典容量及掩码值会发生改变,同一个键与掩码经位运算后得到的索引值就会发生改变,从而导致根据键查找不到值的情况。解决这个问题的方法是,新扩容的内存放到一个全新的Hash表中(ht[1]),并给字典打上在进行rehash操作中的标识(即rehashidx! =-1)。此后,新添加的键值对都往新的Hash表中存储;而修改、删除、查找操作需要在ht[0]、ht[1]中进行检查,然后再决定去对哪个Hash表操作。除此之外,还需要把老Hash表(ht[0])中的数据重新计算索引值后全部迁移插入到新的Hash表(ht[1])中,此迁移过程称作rehash。
先看增加单个entry的操作:
/* Add an element to the target hash table */
int dictAdd(dict *d, void *key, void *val)
{
    dictEntry *entry = dictAddRaw(d,key,NULL);
    if (!entry) return DICT_ERR;
    dictSetVal(d, entry, val);
    return DICT_OK;
}

dictEntry *dictAddRaw(dict *d, void *key, dictEntry **existing)
{
    long index;
    dictEntry *entry;
    int htidx;

    // 如果正在rehash,在add时进行一步rehash,这里是将大范围的rehash分散来减小资源集中消耗
    if (dictIsRehashing(d)) _dictRehashStep(d);

    /* Get the index of the new element, or -1 if
     * the element already exists. */
    if ((index = _dictKeyIndex(d, key, dictHashKey(d,key), existing)) == -1)
        return NULL;

    /* Allocate the memory and store the new entry.
     * Insert the element in top, with the assumption that in a database
     * system it is more likely that recently added entries are accessed
     * more frequently. */
    htidx = dictIsRehashing(d) ? 1 : 0;
    size_t metasize = dictMetadataSize(d);
    entry = zmalloc(sizeof(*entry) + metasize);
    if (metasize > 0) {
        memset(dictMetadata(entry), 0, metasize);
    }
    // 插入在顶部:根据时空局限性
    entry->next = d->ht_table[htidx][index];
    d->ht_table[htidx][index] = entry;
    d->ht_used[htidx]++;

    /* Set the hash entry fields. */
    dictSetKey(d, entry, key);
    return entry;
}
可以看出,add调用了一个底层的addraw函数。addraw首先使用dictkeyindex来查找一个合适的插入位置,如果这个key已经存在就退出add操作。然后确定是否在rehash,上面我们讲过如果在rehash那么 新添加的键值对都往新的Hash表中存储。后面就申请空间在相应位置顶部插入,这是数据库时空局限性的体现。
这里看一下dictSetKey和dictSetVal:
#define dictSetKey(d, entry, _key_) do { \
    if ((d)->type->keyDup) \
        (entry)->key = (d)->type->keyDup((d), _key_); \
    else \
        (entry)->key = (_key_); \
} while(0)

#define dictSetVal(d, entry, _val_) do { \
    if ((d)->type->valDup) \
        (entry)->v.val = (d)->type->valDup((d), _val_); \
    else \
        (entry)->v.val = (_val_); \
} while(0)
可以看出是用宏的形式调用dict的dicttype函数,也就是说这些操作是可以调整的。
扩容操作:
// 将d扩容到2^size的大小
int _dictExpand(dict *d, unsigned long size, int* malloc_failed)
{
    if (malloc_failed) *malloc_failed = 0;

    /* the size is invalid if it is smaller than the number of
     * elements already inside the hash table */
    if (dictIsRehashing(d) || d->ht_used[0] > size)
        return DICT_ERR;

    /* the new hash table */
    dictEntry **new_ht_table;
    unsigned long new_ht_used;
    signed char new_ht_size_exp = _dictNextExp(size);

    /* Detect overflows */
    size_t newsize = 1ul<<new_ht_size_exp;
    // 后者判断在什么时候成立?
    if (newsize < size || newsize * sizeof(dictEntry*) < newsize)
        return DICT_ERR;

    /* Rehashing to the same table size is not useful. */
    if (new_ht_size_exp == d->ht_size_exp[0]) return DICT_ERR;

    /* Allocate the new hash table and initialize all pointers to NULL */
    if (malloc_failed) {
        new_ht_table = ztrycalloc(newsize*sizeof(dictEntry*));
        *malloc_failed = new_ht_table == NULL;
        if (*malloc_failed)
            return DICT_ERR;
    } else
        new_ht_table = zcalloc(newsize*sizeof(dictEntry*));

    // 新的hash表被使用的数量
    new_ht_used = 0;

    /* Is this the first initialization? If so it's not really a rehashing
     * we just set the first hash table so that it can accept keys. */
    if (d->ht_table[0] == NULL) {
        d->ht_size_exp[0] = new_ht_size_exp;
        d->ht_used[0] = new_ht_used;
        d->ht_table[0] = new_ht_table;
        return DICT_OK;
    }

    /* Prepare a second hash table for incremental rehashing */
    d->ht_size_exp[1] = new_ht_size_exp;
    d->ht_used[1] = new_ht_used;
    d->ht_table[1] = new_ht_table;
    d->rehashidx = 0;
    return DICT_OK;
}
首先判断是否在rehash,在rehash中不能扩容。然后创建一个新的hash table,这个newsize是2的n次幂。expand操作在刚开始初始化时会使用,也会在这里做一个判断。更常用的是在扩容后进行rehash操作。
获得size的函数:
// 确保hash cap 为2的N次幂
static signed char _dictNextExp(unsigned long size)
{
    unsigned char e = DICT_HT_INITIAL_EXP;

    if (size >= LONG_MAX) return (8*sizeof(long)-1);
    // 1 << e == 1 * 2^e
    // 找到一个大于size 的2^e
    while(1) {
        if (((unsigned long)1<<e) >= size)
            return e;
        e++;
    }
}
渐进式Rehash
直接看函数:
int dictRehash(dict *d, int n) {
    int empty_visits = n*10; /* Max number of empty buckets to visit. */
    if (!dictIsRehashing(d)) return 0;

    while(n-- && d->ht_used[0] != 0) {
        dictEntry *de, *nextde;

        /* Note that rehashidx can't overflow as we are sure there are more
         * elements because ht[0].used != 0 */
        assert(DICTHT_SIZE(d->ht_size_exp[0]) > (unsigned long)d->rehashidx);
        while(d->ht_table[0][d->rehashidx] == NULL) {
            d->rehashidx++;
            if (--empty_visits == 0) return 1;
        }
        de = d->ht_table[0][d->rehashidx];
        /* Move all the keys in this bucket from the old to the new hash HT */
        while(de) {
            uint64_t h;

            nextde = de->next;
            /* Get the index in the new hash table */
            h = dictHashKey(d, de->key) & DICTHT_SIZE_MASK(d->ht_size_exp[1]);
            de->next = d->ht_table[1][h];
            d->ht_table[1][h] = de;
            d->ht_used[0]--;
            d->ht_used[1]++;
            de = nextde;
        }
        d->ht_table[0][d->rehashidx] = NULL;
        d->rehashidx++;
    }

    /* Check if we already rehashed the whole table... */
    if (d->ht_used[0] == 0) {
        zfree(d->ht_table[0]);
        /* Copy the new ht onto the old one */
        d->ht_table[0] = d->ht_table[1];
        d->ht_used[0] = d->ht_used[1];
        d->ht_size_exp[0] = d->ht_size_exp[1];
        _dictReset(d, 1);
        d->rehashidx = -1;
        return 0;
    }

    /* More to rehash... */
    return 1;
}
rehash除了扩容时会触发,缩容时也会触发。Redis整个rehash的实现,主要分为如下几步完成。
- 给Hash表ht[1]申请足够的空间;扩容时空间大小为当前容量2,即d->ht[0]. used2;当使用量不到总空间10%时,则进行缩容。缩容时空间大小则为能恰好包含d->ht[0].used个节点的2^N次方幂整数,并把字典中字段rehashidx标识为0
- 进行rehash操作调用的是dictRehash函数,重新计算ht[0]中每个键的Hash值与索引值(重新计算就叫rehash),依次添加到新的Hash表ht[1],并把老Hash表中该键值对删除。把字典中字段rehashidx字段修改为Hash表ht[0]中正在进行rehash操作节点的索引值.
- rehash操作后,清空ht[0],然后对调一下ht[1]与ht[0]的值,并把字典中rehashidx字段标识为-1。
我们知道,Redis可以提供高性能的线上服务,而且是单进程模式,当数据库中键值对数量达到了百万、千万、亿级别时,整个rehash过程将非常缓慢,如果不优化rehash过程,可能会造成很严重的服务不可用现象。Redis优化的思想很巧妙,利用分而治之的思想了进行rehash操作,大致的步骤如下。
执行插入、删除、查找、修改等操作前,都先判断当前字典rehash操作是否在进行中,进行中则调用dictRehashStep函数进行rehash操作(每次只对1个节点进行rehash操作,共执行1次)。除这些操作之外,当服务空闲时,如果当前字典也需要进行rehsh操作,则会调用incrementallyRehash函数进行批量rehash操作(每次对100个节点进行rehash操作,共执行1毫秒)。在经历N次rehash操作后,整个ht[0]的数据都会迁移到ht[1]中,这样做的好处就把是本应集中处理的时间分散到了上百万、千万、亿次操作中,所以其耗时可忽略不计。
/* This function performs just a step of rehashing, and only if hashing has
 * not been paused for our hash table. When we have iterators in the
 * middle of a rehashing we can't mess with the two hash tables otherwise
 * some elements can be missed or duplicated.
 *
 * This function is called by common lookup or update operations in the
 * dictionary so that the hash table automatically migrates from H1 to H2
 * while it is actively used. */
static void _dictRehashStep(dict *d) {
    if (d->pauserehash == 0) dictRehash(d,1);
}
删除
static dictEntry *dictGenericDelete(dict *d, const void *key, int nofree) {
    uint64_t h, idx;
    dictEntry *he, *prevHe;
    int table;

    /* dict is empty */
    if (dictSize(d) == 0) return NULL;

    if (dictIsRehashing(d)) _dictRehashStep(d);
    h = dictHashKey(d, key);

    for (table = 0; table <= 1; table++) {
        idx = h & DICTHT_SIZE_MASK(d->ht_size_exp[table]);
        he = d->ht_table[table][idx];
        prevHe = NULL;
        // 查找
        while(he) {
            if (key==he->key || dictCompareKeys(d, key, he->key)) {
                /* Unlink the element from the list */
                if (prevHe)
                    prevHe->next = he->next;
                else // 在bucket顶部,直接略过
                    d->ht_table[table][idx] = he->next;
                if (!nofree) {
                    dictFreeUnlinkedEntry(d, he);
                }
                d->ht_used[table]--;
                return he;
            }
            prevHe = he;
            he = he->next;
        }
        if (!dictIsRehashing(d)) break;
    }
    return NULL; /* not found */
}
遍历
遍历Redis整个数据库主要有两种方式:全遍历(例如keys命令)、间断遍历(hscan命令):
- 全遍历: 一次命令执行就遍历完整个数据库。
- 间断遍历: 每次命令执行只取部分数据,分多次遍历。
迭代器——可在容器(容器可为字典、链表等数据结构)上遍访的接口,设计人员无须关心容器的内容,调用迭代器固定的接口就可遍历数据,在很多高级语言中都有实现。
字典迭代器主要用于迭代字典这个数据结构中的数据,既然是迭代字典中的数据,必然会出现一个问题,迭代过程中,如果发生了数据增删,则可能导致字典触发rehash操作,或迭代开始时字典正在进行rehash操作,从而导致一条数据可能多次遍历到。
typedef struct dictIterator {
    dict *d;
    long index; // 迭代hash中的索引值
    // safe 为1表示是安全迭代器,可以在add,find等rehash场景中使用
    int table, safe;
    // entry 当前读取节点,nextEntry entry 节点的next字段
    dictEntry *entry, *nextEntry;
    /* unsafe iterator fingerprint for misuse detection. */
    unsigned long long fingerprint;// 字典指纹,字典发生改变随之改变
} dictIterator;
fingerprint字段是一个64位的整数,表示在给定时间内字典的状态。在这里称其为字典的指纹,因为该字段的值为字典(dict结构体)中所有字段值组合在一起生成的Hash值,所以当字典中数据发生任何变化时,其值都会不同,生成算法可参见源码dict.c文件中的dictFingerprint函数。
/* A fingerprint is a 64 bit number that represents the state of the dictionary
 * at a given time, it's just a few dict properties xored together.
 * When an unsafe iterator is initialized, we get the dict fingerprint, and check
 * the fingerprint again when the iterator is released.
 * If the two fingerprints are different it means that the user of the iterator
 * performed forbidden operations against the dictionary while iterating. */
unsigned long long dictFingerprint(dict *d) {
    unsigned long long integers[6], hash = 0;
    int j;

    integers[0] = (long) d->ht_table[0];
    integers[1] = d->ht_size_exp[0];
    integers[2] = d->ht_used[0];
    integers[3] = (long) d->ht_table[1];
    integers[4] = d->ht_size_exp[1];
    integers[5] = d->ht_used[1];

    /* We hash N integers by summing every successive integer with the integer
     * hashing of the previous sum. Basically:
     *
     * Result = hash(hash(hash(int1)+int2)+int3) ...
     *
     * This way the same set of integers in a different order will (likely) hash
     * to a different number. */
    for (j = 0; j < 6; j++) {
        hash += integers[j];
        /* For the hashing step we use Tomas Wang's 64 bit integer hash. */
        hash = (~hash) + (hash << 21); // hash = (hash << 21) - hash - 1;
        hash = hash ^ (hash >> 24);
        hash = (hash + (hash << 3)) + (hash << 8); // hash * 265
        hash = hash ^ (hash >> 14);
        hash = (hash + (hash << 2)) + (hash << 4); // hash * 21
        hash = hash ^ (hash >> 28);
        hash = hash + (hash << 31);
    }
    return hash;
}
根据迭代器结构中的safe字段,将迭代器分为普通迭代器和安全迭代器:
- 普通迭代器: 只遍历数据
- 安全迭代器: 遍历的同时删除数据
普通迭代器
普通迭代器迭代字典中数据时,会对迭代器中fingerprint字段的值作严格的校验,来保证迭代过程中字典结构不发生任何变化,确保读取出的数据不出现重复
当Redis执行部分命令时会使用普通迭代器迭代字典数据,例如sort命令。sort命令主要作用是对给定列表、集合、有序集合的元素进行排序,如果给定的是有序集合,其成员名存储用的是字典,分值存储用的是跳跃表,则执行sort命令读取数据的时候会用到迭代器来遍历整个字典。
     dict *set = ((zset*)sortval->ptr)->dict;
        dictIterator *di;
        dictEntry *setele;
        sds sdsele;
        di = dictGetIterator(set);
        while((setele = dictNext(di)) != NULL) {
            sdsele =  dictGetKey(setele);
            vector[j].obj = createStringObject(sdsele,sdslen(sdsele));
            vector[j].u.score = 0;
            vector[j].u.cmpobj = NULL;
            j++;
        }
        dictReleaseIterator(di);
调用dictGetIterator函数初始化一个普通迭代器,此时会把iter->safe值置为0,表示初始化的迭代器为普通迭代器
void dictInitIterator(dictIterator *iter, dict *d)
{
    iter->d = d;
    iter->table = 0;
    iter->index = -1;
    iter->safe = 0;
    iter->entry = NULL;
    iter->nextEntry = NULL;
}

dictIterator *dictGetIterator(dict *d)
{
  dictIterator *iter = zmalloc(sizeof(*iter));
  dictInitIterator(iter, d);
  return iter;
}
循环调用dictNext函数依次遍历字典中Hash表的节点,首次遍历时会通过dictFingerprint函数拿到当前字典的指纹值。